
Omnisend does have a countdown of its own. The Countdown timer element sits in Add Elements, takes an end date and time, and lets you set the format, fonts, colours, alt text and a fallback image. Two things about it decide whether it’s the right Omnisend countdown timer for you. It’s for paid plans only, and it counts to one fixed date for everyone. There’s no evergreen mode and no way to read a deadline from the contact.
For a sale ending Sunday on a paid plan, use it. For a free-plan store, or for the abandoned-cart and welcome flows where every contact’s clock should start at a different moment, this guide adds an Alterable countdown timer through the HTML element instead.
Step 1: Create the timer in Alterable
-
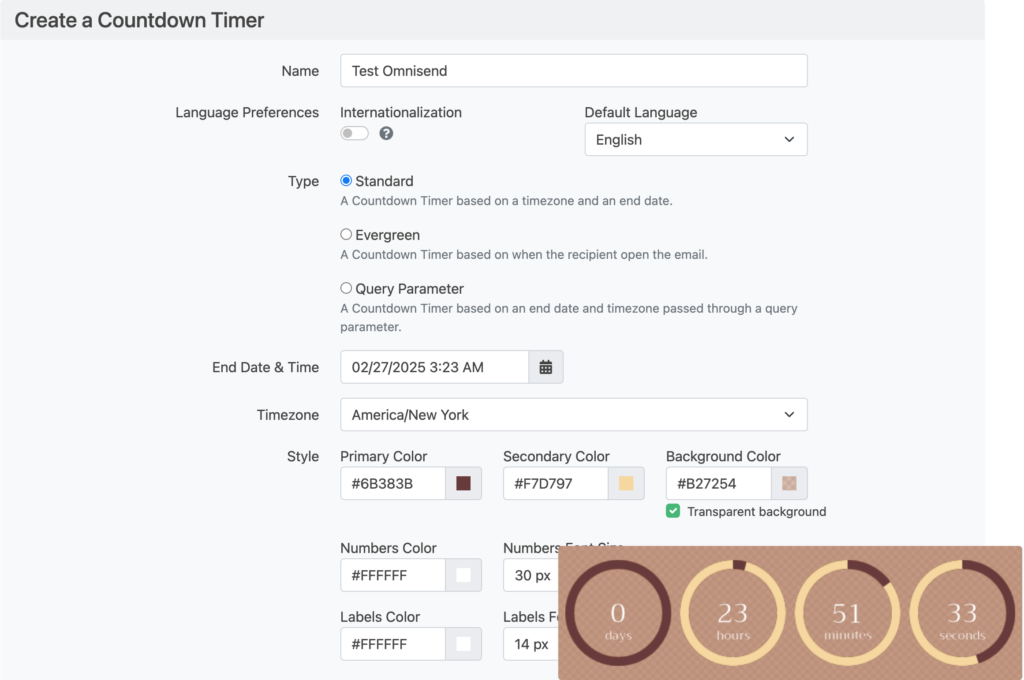
Open the Alterable countdown timer page and pick a starting point: one of the templates, or Start from scratch.
-
Under Counts down to, pick a type. A date is one deadline for everyone. Time after opening starts each contact’s own window at their first open, which is what a cart-recovery flow wants. A date in the link reads the deadline from a contact property in the image URL.
-
Set the deadline and its timezone, then match the style to your template.
-
Click Create and copy the embed, a link wrapped around an image. Before you copy it, choose Omnisend under Email platform, and Alterable writes Omnisend’s tags into it for you.
<a href="https://next.alterable.com/countdown-timers/click/YOUR-TIMER-ID">
    <img src="https://next.alterable.com/countdown-timers/YOUR-TIMER-ID.png?uid=[[contact.email]]" />
</a>
Step 2: Add the countdown timer to your Omnisend email
-
Open the campaign or automation email in the Email Builder.
-
In Add Elements, drag the HTML element into the template where the timer should sit.
-
Click the element and paste the Alterable embed into the code editor on the right. Leave the separate Styles input empty.
-
Save.
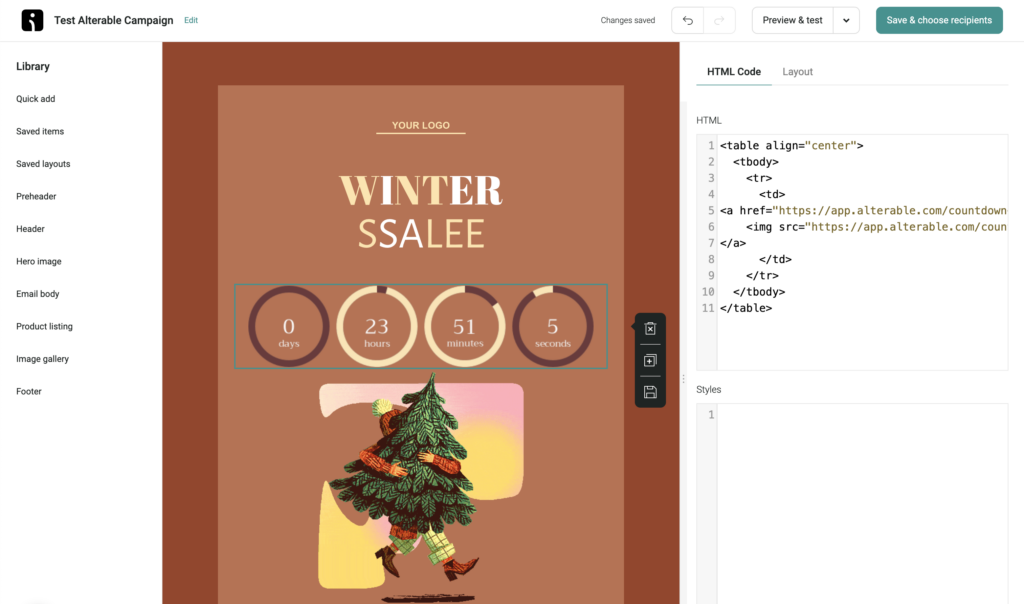
Omnisend’s HTML element documentation asks for body content only and refuses to save a list of tags: iframe, script, div, font, video, audio, object, embed. The div one surprises people, but the Alterable embed doesn’t use it. It’s a link and an image, both allowed. Image URLs must be absolute https, which they are. The element works in Automation Workflows exactly as in a campaign.
Per-contact deadlines with Omnisend’s Liquid tags
Omnisend’s templating is a Liquid variant with double square brackets, and its own HTML element guide puts a tag inside an image URL, so this is supported ground.
An evergreen timer starts each contact’s window at their first open, so it needs to know who’s opening to start and keep that contact’s clock. Choosing Omnisend under Email platform in Alterable’s embed dialog adds the tag for you:
<img src="https://next.alterable.com/countdown-timers/YOUR-TIMER-ID.png?uid=[[contact.email]]" />Omnisend doesn’t document a tag for its own subscriber ID, so this passes the email address, which puts it in the image URL. If you keep a subscriber ID of your own in a custom field, pass that instead.
A query parameter timer takes the deadline itself, as an ISO date such as 2026-10-01T18:00:00Z. Omnisend imports contact dates in ISO 8601 already, and custom properties are addressed by name:
<img src="https://next.alterable.com/countdown-timers/YOUR-TIMER-ID.png?date=[[contact.custom_properties.offer_end]]" />date is the timer’s Parameter name in Alterable, which is the default. If you rename it, use your name in place of date. You don’t have to write the parameter by hand, either: for a timer like this the embed dialog has an End date box, and pasting the field’s merge tag there puts it in the code for you.
Store the property as the full ISO string and pass it through untouched. Omnisend’s date filter can reformat a real date property with strftime tokens if you need to, but text in, text out is the version that holds up against real data.
Testing an Omnisend countdown timer
Omnisend is candid that its test emails and Preview don’t render dynamic tags, and that automations can only be tested by triggering them. So a URL containing [[contact.email]] arrives literal in a test and the image fails. Omnisend’s own advice is the right one: send the campaign live to a segment that contains only your address. A standard timer has no tag in it and shows correctly in an ordinary test.
Once the deadline passes, the timer holds at zero, or shows the text or image you chose as its expiry placeholder in Alterable. Unlike a fallback image set per element, that placeholder is on the timer, so every email already in an inbox shows it on the next open.
Check it in a real inbox
Send a real test to your own address and open it. The timer should show the time left to your deadline, and a later open should show less. If the image comes through broken, check that every merge tag in its URL was filled in for that send.
Your weekend deal ends soon
Weekend deal ends in
Example: 2 days, 14 hours and 36 minutes left.